How to Get Started with AlpineJS in Hyvä Themes
Most developers understand that JavaScript offers a base for programming, and also improves productivity by providing abstractions of repetitive work incorporating thus maintaining performance and code structure due to which modern JavaScript frameworks have become essential for building efficient, dynamic, and responsive user interfaces.
There are many JavaScript frameworks available in the market, among which Alpine.js stands out for its simplicity and power, particularly in the context of Magento 2 hyva theme development services.
Lightweight yet versatile, Alpine.js in hyva themes enables developers to easily add interactivity and enhance user experience without unnecessary complexity. This guide explores how to effectively use Alpine.js within Hyvä themes, covering core features, compatibility practices, and key directives.
What is Alpine.js?
The rapid innovation in front-end JavaScript frameworks has become a defining phenomenon in technology culture. For over two decades, we’ve seen a steady flow of creative advancements that have enriched both the development process and the quality of digital products.
A standout among these frameworks today is Alpine.js. True to its name, Alpine is a lightweight framework designed to handle complex tasks with simplicity and efficiency. It offers robust functionality in a streamlined, easy-to-learn format.
Alpine.js stands out among JavaScript frameworks for its unique blend of simplicity, speed, and flexibility. While frameworks like React and Vue are widely known, Alpine.js offers developers a streamlined, efficient alternative without sacrificing essential functionality which became a reason to opt for Alpine.js in the hyva theme.
Key Features of Alpine.js In Hyva Theme
Declarative Approach:
Alpine.js enables a declarative style by using directives in HTML, improving code readability and clarity. Directives such as `x-show`, `x-if`, and `x-for` allow developers to manage DOM elements directly with data attributes, eliminating the need for complex JavaScript manipulations.
Lightweight and Fast:
With a size of under 20kb, Alpine.js is remarkably lightweight, making it ideal for fast-loading websites and single-page applications where performance is key.
Reactive Data System:
Inspired by Vue.js, Alpine.js in the hyva theme offers data reactivity, ensuring that any changes in data automatically update the DOM, enhancing the user experience with real-time responsiveness.
Minimal Setup:
Alpine.js requires no build tools or additional libraries—just add the JavaScript file, and you’re ready to start enhancing HTML with interactive features.
Progressive Enhancement:
Alpine.js enables hyva developers to add interactivity to specific sections of static HTML, ensuring compatibility across various devices and browsers. This approach improves functionality while maintaining broad accessibility.
Flexible Customization:
Alpine.js comes packed with built-in functionalities, yet developers can easily extend its capabilities by creating custom directives and behaviors tailored to project requirements.
Advantages of Using Alpine.js
Perfect for Prototyping and Small Projects:
With a minimal setup and low learning curve, Alpine.js is ideal for prototyping or smaller projects. Developers can quickly add interactivity without diving deep into framework-specific concepts.
Enhanced Code Readability and Maintainability:
By integrating logic directly within HTML, Alpine.js promotes clear, easy-to-read code, making collaboration and long-term maintenance simpler.
Seamlessly Complements Other Frameworks:
For developers familiar with Vue or React, Alpine.js in hyva theme can enhance specific parts of a project with micro-interactions, making it a valuable addition without the need to integrate a full framework.
Working with AlpineJs in Hyvä Themes
x-data
We can declare a new Alpine Component scope and its data for the HTML block.
It tells the framework to initialize a new component with the following data object.

X-init
It will initialize the component after x-data is triggered.

x-bind
x-bind allows you to set HTML attributes on elements based on the result of JavaScript expressions.
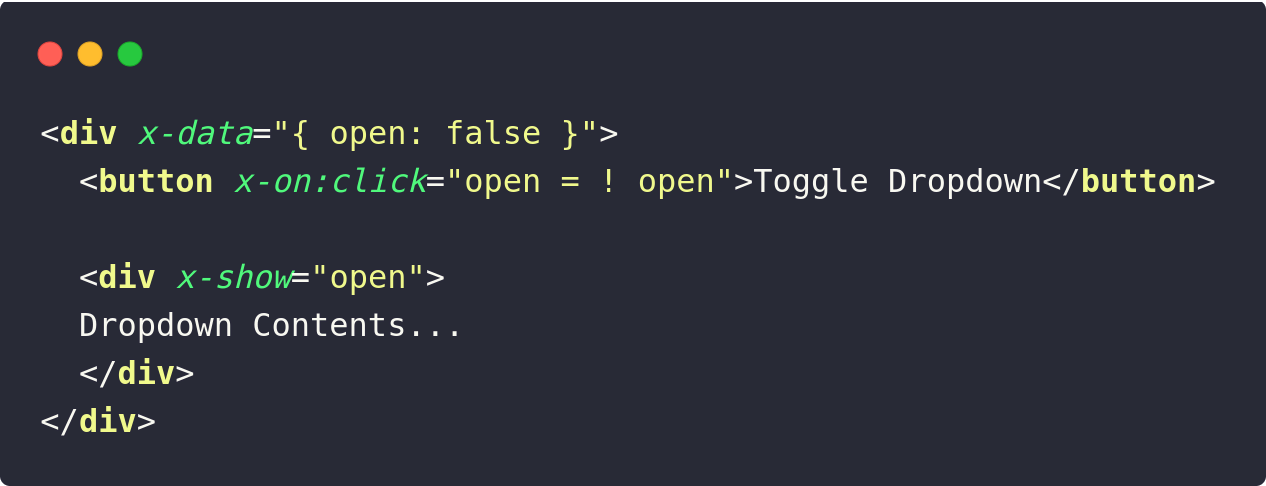
x-on
It can attach events with the elements like button, Input, etc.

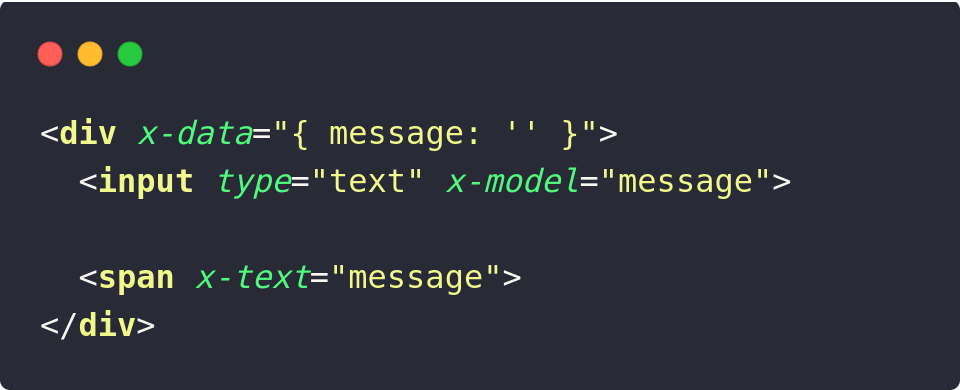
x-text
It can show text data stored in a component to any element.

x-html
It can show HTML data in a component to any element.

x-model
It binds the value of an input element to Alpine data.
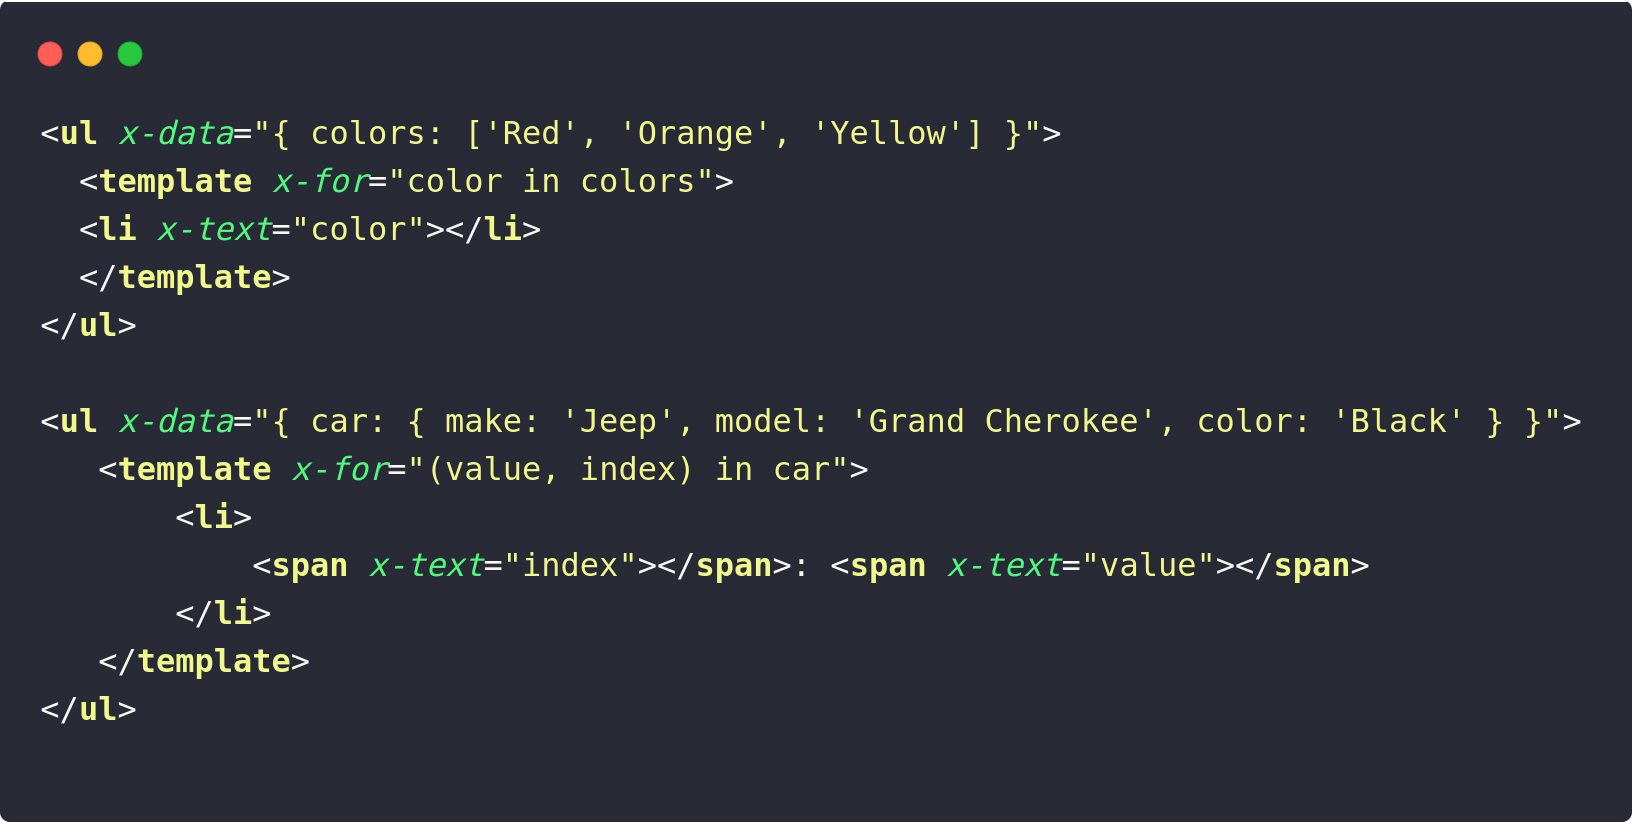
X-for
It creates DOM elements by iterating through a list of arrays or objects.
x-if
It shows/hides the DOM element on the condition matching with the variable in the data.
Here to use x-if, <template> tag is required otherwise it will throw errors.

x-show
It shows/hide the DOM element with inline display CSS. It works without a template tag.
x-ref
It will create a ref to a DOM element with an alias name. It can be used in any component.

x-cloak
Sometimes, your component’s HTML is showing before AlpineJS is initialized, so we can hide it with this.
After the AlpineJS is initialized, it will remove the x-clock and show your components.
CSS:

Your HTML here

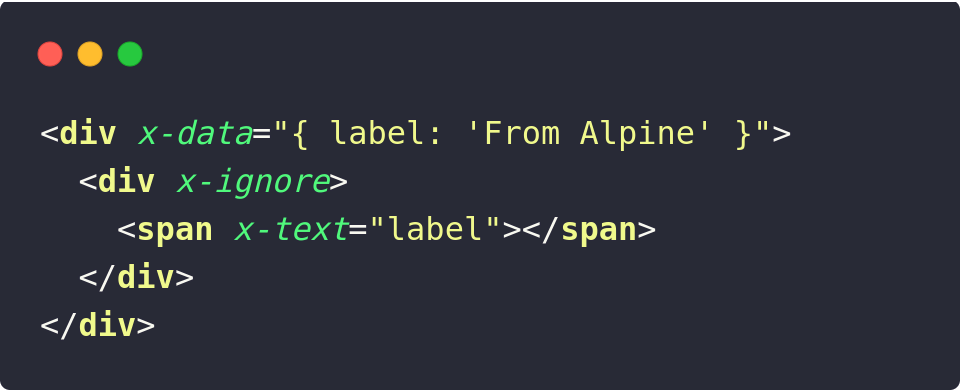
x-ignore
By default, Alpine will crawl and initialize the entire DOM tree of an element containing x-init or x-data.
If for some reason, you don’t want Alpine to touch a specific section of your HTML, you can prevent it from doing so using x-ignore.
For writing AlpineJS in your favourite editor like PHP Storm, or VS Code, you can try these plugins:
Here are some tools to debug AlpineJS in the browser:
How to make Alpine V2 and V3 compatible code in Hyva themes?
Building Alpine components that work smoothly with both version 2 and version 3 is quite simple. This guide offers essential tips for ensuring your extensions remain compatible across different Hyvä versions.
For compatibility with both Alpine.js versions 2 and 3, make use of the x-spread directive for version 2 and x-bind for version 3 in your code.
Here’s an example:

In the above example:
– `x-data` initializes a data object with an `attributes` property containing CSS attributes.
– `x-spread` applies the attributes from the `attributes` object directly to the parent `<div>`, allowing dynamic attribute addition based on the data object.
– `x-bind:title` dynamically binds the `title` attribute of the `<p>` element to the value of `attributes[‘class’]`, so hovering over the paragraph displays a tooltip with the `class` attribute’s value.
This code is compatible with both Alpine.js v2 and v3 by using shared directives and syntax for data and attribute binding.
Working with `$el`
In Alpine.js v2, `$el` consistently points to the root DOM element of the component. However, in v3, `$el` refers to the DOM element currently being evaluated in a binding.
To ensure compatibility across Alpine.js versions 2 and 3, limit `$el` usage to the base element of the component. For references to other elements within the component, follow these guidelines:
– Alpine.js v2: Use `x-ref` to assign a reference to the element.
– Alpine.js v3: Use `querySelector()` in vanilla JavaScript to target the desired element.
By adopting this approach, your components will remain compatible across both Alpine.js versions.
Example:
In Alpine.js version 2, you would typically use $el to reference the root DOM element of the component.

In Alpine.js version 3, $el refers to the DOM element currently being evaluated within the binding context.

In the above Alpine.js v3 example, $el in x-init refers to the <div> element with the x-ref=”myDiv” attribute.
Using `$root`
In Alpine.js v2, it’s generally best to avoid `$root` altogether. However, if you do need it and want compatibility with Alpine.js v3, you can create an alias for `$root` in an initialization method. Here’s how:
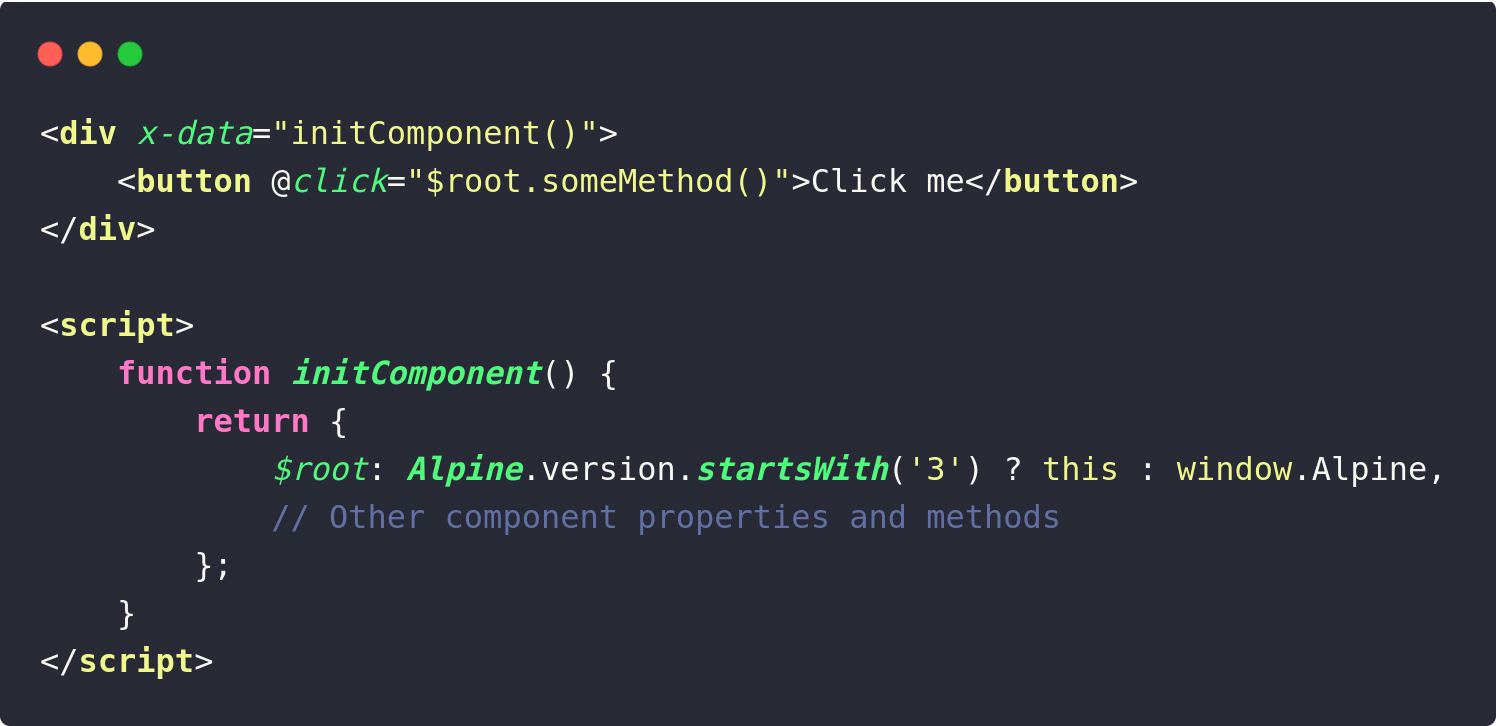
In the example:
– The `initComponent` function serves as the `x-data` value, returning an object with the component’s properties and methods.
– Inside `initComponent`, `$root` is aliased to either `this` (the component instance) or `window.Alpine`, depending on the version of Alpine.js in use.
– This setup ensures `$root` is accessible and points to the correct object regardless of the Alpine.js version.
This approach enables `$root` usage that’s compatible with both Alpine.js v2 and v3.
Using `x-init`
For consistent behavior across both Alpine.js v2 and v3, avoid relying on automatic invocation of the `init` method in Alpine.js v3. Instead, specify `x-init=”init”` explicitly to ensure it behaves the same in both versions.
Handling Clicks Outside the Element
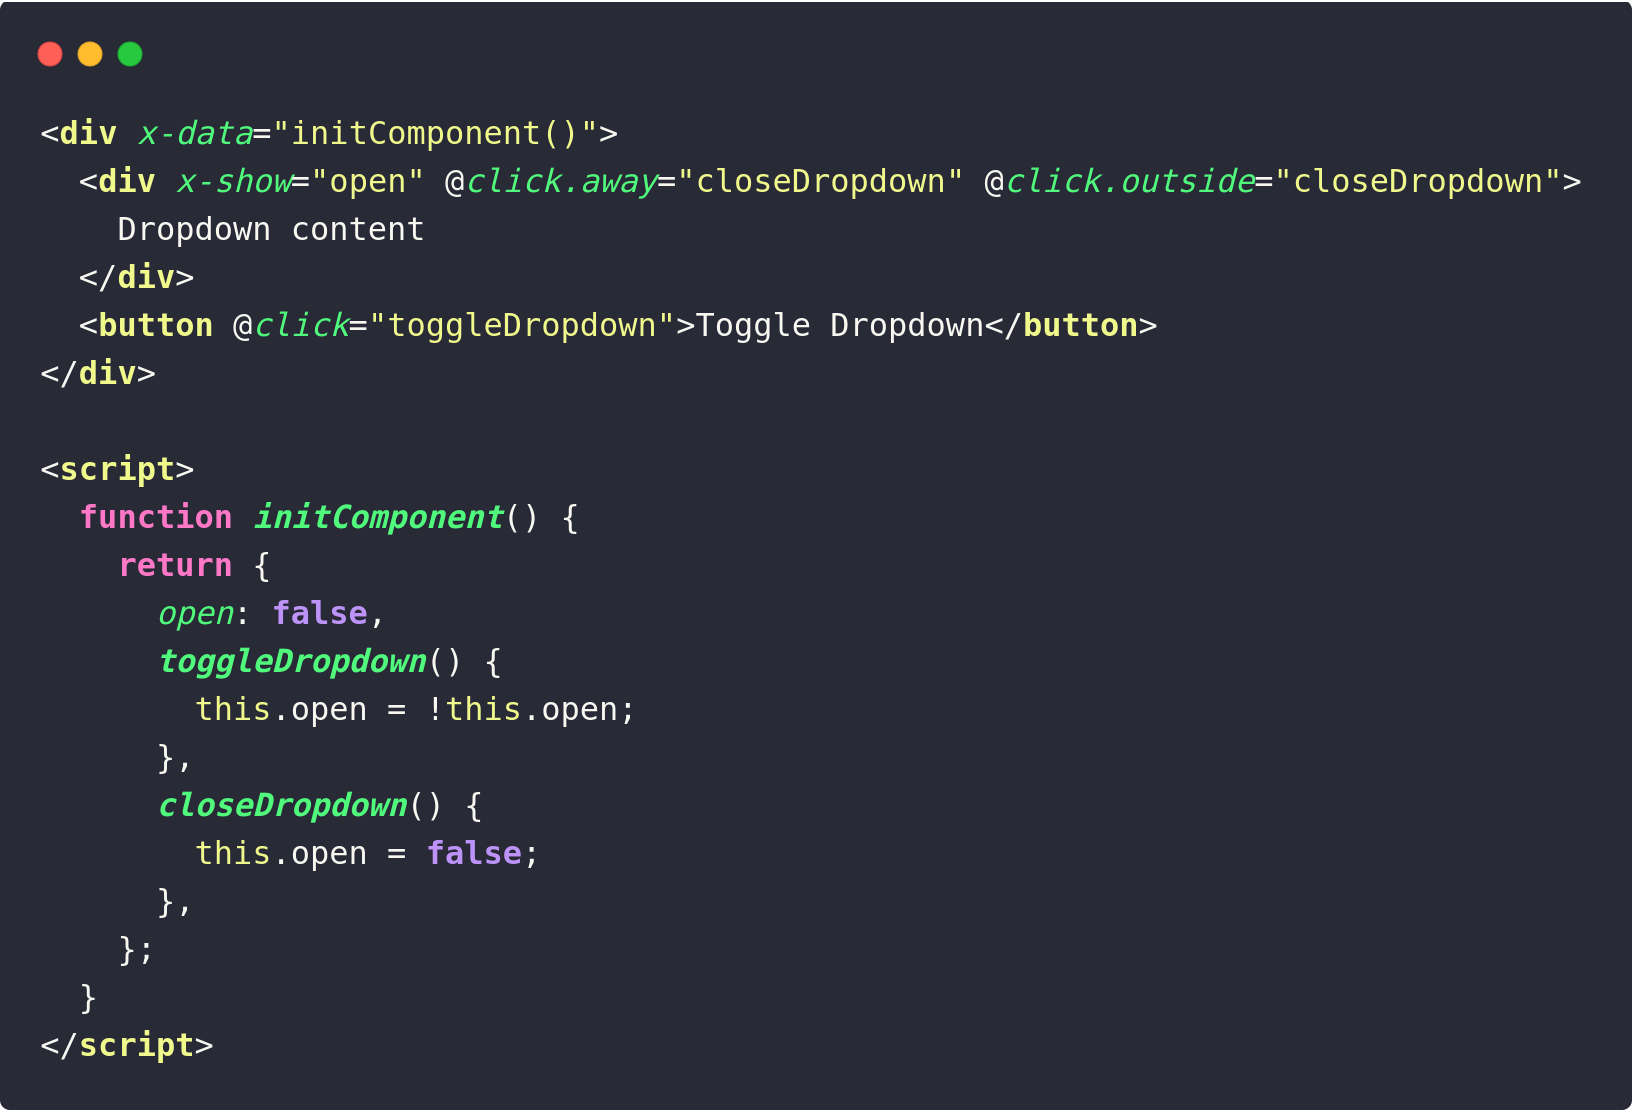
To accommodate both Alpine.js versions when handling outside clicks, use both event modifiers. Use `@click.away` for Alpine.js v2 and `@click.outside` for Alpine.js v3.
In this example:
– The `initComponent` function initializes the component with a data property `open` to manage dropdown visibility.
– The `toggleDropdown` method toggles `open` when the button is clicked.
– Both `@click.away` and `@click.outside` directives are applied on the `<div>` element, ensuring compatibility across versions. Alpine.js v2 will respond to `click.away`, while Alpine.js v3 will respond to `click.outside`, both triggering `closeDropdown` when a click occurs outside the dropdown.
This setup allows seamless handling of outside clicks in both Alpine.js v2 and v3, providing compatibility regardless of the version in use.
We use

Instead Of

Warning for Outdated Alpine Versions
If your module is compatible with only one Alpine.js version, it’s essential to clearly state this in the module’s README and documentation. This is particularly important in Magento instances with multiple store views, where each theme might use a different version of Alpine.js.
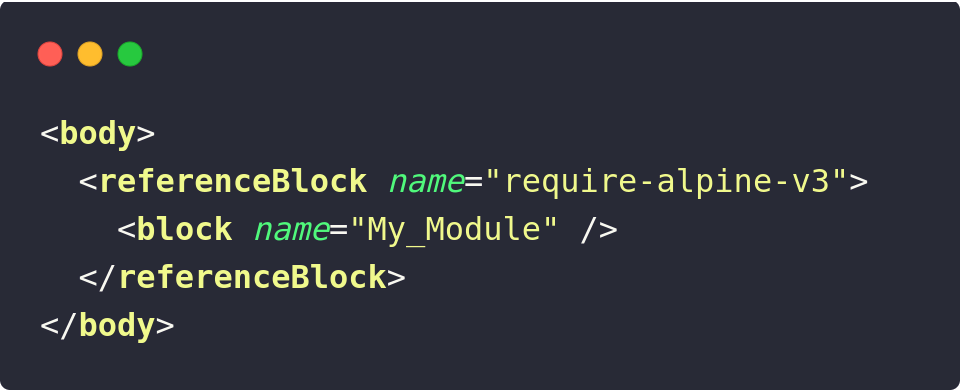
To define a dependency on a minimum Alpine version, modules can use layout XML to add a child to the `require-alpine-v3` block. This approach helps manage dependencies effectively and ensures version compatibility across different themes within the Magento instance.
If this module is used with a theme that employs a lower version of Alpine.js, a warning will be logged to the browser console.

The name of the child block should match the module name, since it will be listed in the error message.
Conclusion
Alpine.js in hyva theme offers a flexible, lightweight solution for handling front-end interactions in Hyvä themes, allowing Magento 2 and hyva developers to create dynamic components with ease. By following the strategies outlined in this guide—such as implementing essential directives, ensuring compatibility across Alpine versions, and managing dependencies— hyva developers can harness Alpine.js to build cohesive, high-performance interfaces.
As JavaScript frameworks continue to evolve, Alpine.js provides a balanced approach, delivering powerful functionality without excessive overhead, making it a valuable tool for any developer working within Hyvä themes. Moreover, Rock Technolabs has been offering end-to-end Magento development services since the past 1 decade so in case you need assistance, we are just a call away – +91 99047 96885.


