How to add a custom tab to the customer account in Magento 2?

In this article, we will discuss how to add a custom tab to the customer account in Magento 2. In Default Magento 2 user will be redirected in “My Account” Section after login. To add a custom tab to the customer account in Magento 2, follow the below steps:
Step 1:
Create customer_account.xml file at app/code/Mageants/Blog/view/frontend/layout/customer_account.xml
| <page xmlns:xsi=”http://www.w3.org/2001/XMLSchema-instance” xsi:noNamespaceSchemaLocation=”urn:magento:framework:View/Layout/etc/page_configuration.xsd”> <body> <referenceBlock name=”customer_account_navigation”> <block class=”Magento\Framework\View\Element\Html\Link\Current” name=”customer-account-navigation-custom”> <arguments> <argument name=”path” xsi:type=”string”> blog/index/index</argument> <argument name=”label” xsi:type=”string”> Custom Tab</argument> </arguments> </block> </referenceBlock> </body> </page> |
Step 2:
Create blog_index_index.xml file at following path:
app/code/Mageants/Blog/view/frontend/layout/blog_index_index.xml
| <page xmlns:xsi=”http://www.w3.org/2001/XMLSchema-instance” xsi:noNamespaceSchemaLocation=”../../../../../../../lib/internal/Magento/Framework/View/Layout/etc/page_configuration.xsd”> <update handle=”customer_account”/> <body> <referenceBlock name=”page.main.title”> <action method=”setPageTitle”> <argument translate=”true” name=”title” xsi:type=”string”> Custom Tab</argument> </action> </referenceBlock> <referenceContainer name=”content”> <block class=”Magento\Framework\View\Element\Template” name=”my_tab” template=”Mageants_Blog::customtab.phtml”> </block> </referenceContainer> </body> </page> |
Step 3:
Now create routes.xml file at below path:
app/code/Mageants/Blog/etc/frontend/routes.xml
| <?xml version=”1.0″ ?> <config xmlns:xsi=”http://www.w3.org/2001/XMLSchema-instance” xsi:noNamespaceSchemaLocation=”urn:magento:framework:App/etc/routes.xsd”> <router id=”standard”> <route frontName=”blog” id=”blog”> <module name=”Mageants_Blog”/> </route> </router> </config> |
Step 4:
Create Index.php file at below path:
app/code/Mageants/Blog/Controller/Index/Index.php
| <?php namespace Mageants\Blog\Controller\Index; class Index extends \Magento\Framework\App\Action\Action { public function execute() { $this->_view->loadLayout(); $this->_view->renderLayout(); } } ?> |
Step 5:
Create phtml file for display frontend output at below path:
app/code/Mageants/Blog/view/frontend/templates/customtab.phtml
| <?php ?> <span>Custom Tab</span> |
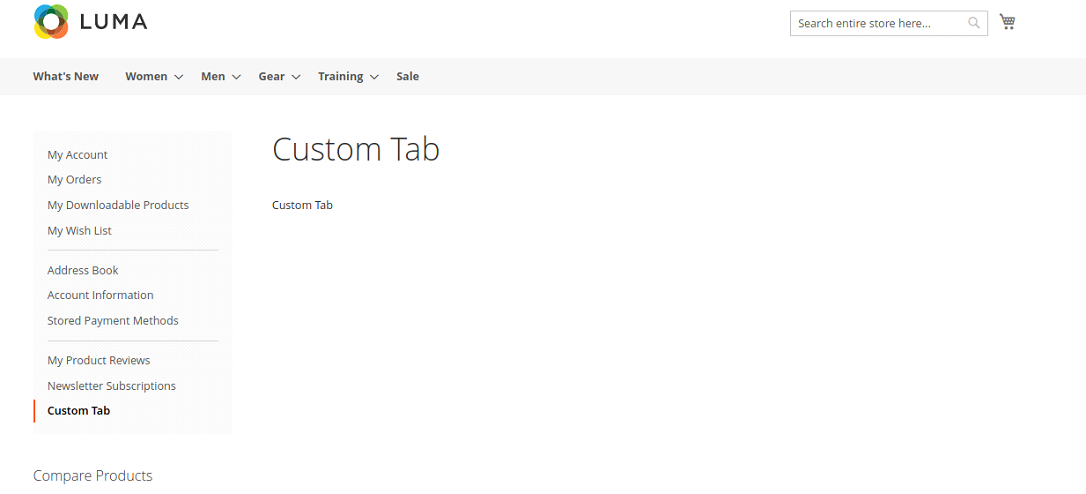
After following the above steps, go to the frontend and login. After Login, you can see our custom tab is created in customer account section.

Recommended Read:
How to Add Custom Text to Login Page in Magento 2?
How to Install Magento 2 Using Composer?
Conclusion:
Using the above blog, you can easily understand how to add a custom tab to the customer account in Magento 2. If you have any query in above code implementation then Contact Us.