Strategies for Successful Magento Theme Development in 2024

Designing an attractive and functional online store is essential for e-commerce success. Magento, a top open-source e-commerce platform, provides powerful features and flexibility for theme creation to support various online businesses.
Besides this,effective Magento theme development allows businesses to improve user experience, reinforce brand identity, and boost sales. This is one of the reasons many merchants are opting for Magento 2 development services for their ecommerce store.
In this guide, we will show you how to create a Magento 2 theme, which can serve as a foundation for developing your own custom Magento 2 visual experience and easily customizing the design layout of all pages.
Step-by-Step Guide for Magento 2 Theme Development & Customization
Disable Cache
Before starting, make sure your Magento cache is disabled to avoid clearing the cache every time you make changes to the theme, saving you significant time during development.
To disable the cache, navigate to Admin → System → Cache Management, select all cache types, and disable them.
Developer Mode
Ensure your Magento store is set to developer mode to reflect changes in real-time and to view any errors during coding.
To enable developer mode, use SSH access to run commands from the terminal. Log in to your Magento store SSH account, go to the Magento root directory, and run the following command:
sh
php bin/magento deploy:mode:set developer
Create Theme
Follow these steps for theme development:
- Create a directory for the theme
- Add a declaration for the theme
- Add a composer.json file
- Add registration.php
- Create directories for CSS, JavaScript, images, and fonts
- Set up the theme logo
- Customize the theme layout
- Configure your theme in the Admin panel
Let’s go through each step in detail.
Create a Directory Containing the Theme
Navigate to `/app/design/frontend` and create a new directory with your chosen vendor name for the theme package.
For example, using “MageIce” as the vendor name: `/app/design/frontend/MageIce`
Next, create your theme directory within the vendor directory. For example, “Icecube”: `/app/design/frontend/MageIce/Icecube/`
app/design/frontend/
├── MageIce/
│ ├── Icecube/
│ │ ├── …
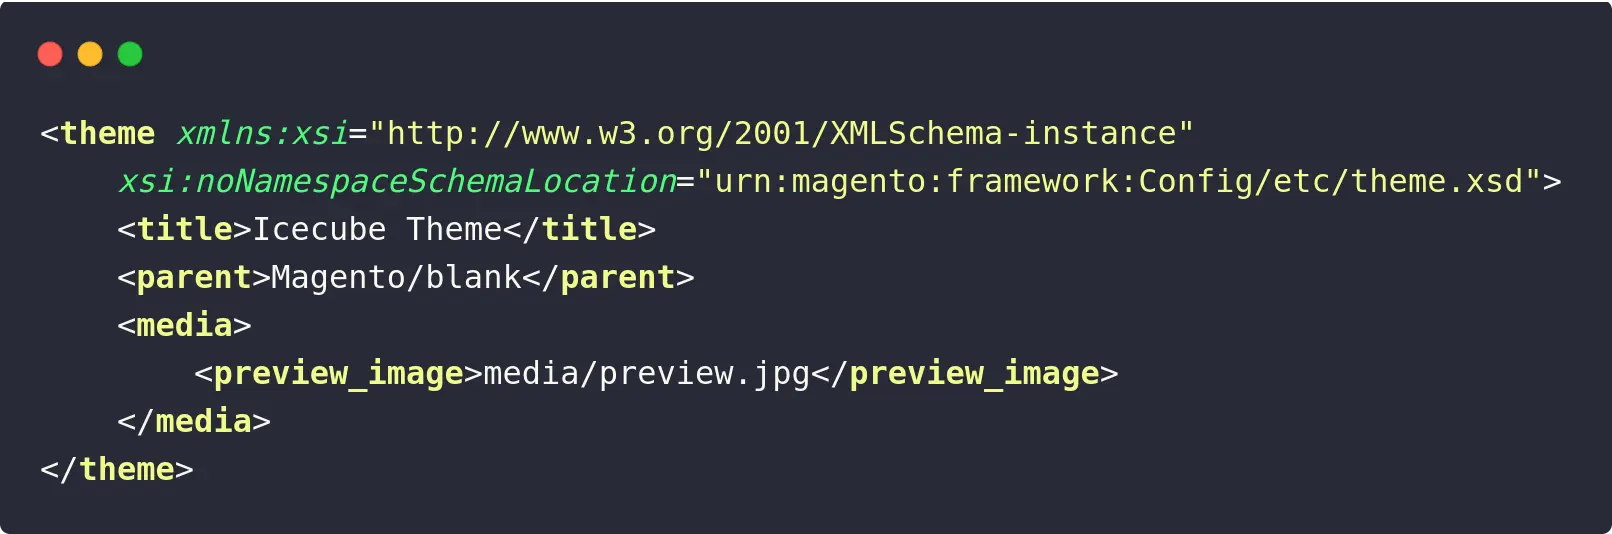
Declare Your Theme
After setting up the directory structure, declare the theme by creating a `theme.xml` file, which includes the theme name and parent theme name if inherited. Optionally, you can specify the theme preview image.
XML
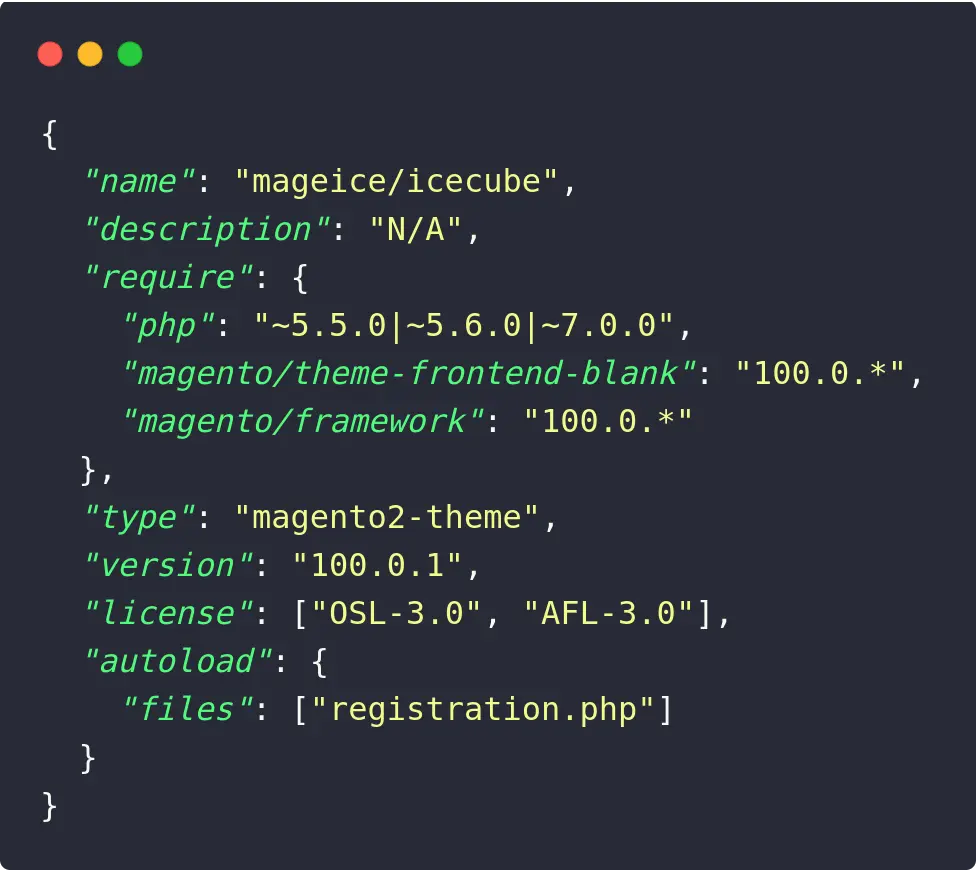
Composer Package
Magento 2 themes are distributed as Composer packages. Register the theme on the server by adding a `composer.json` file (optional).
JSON
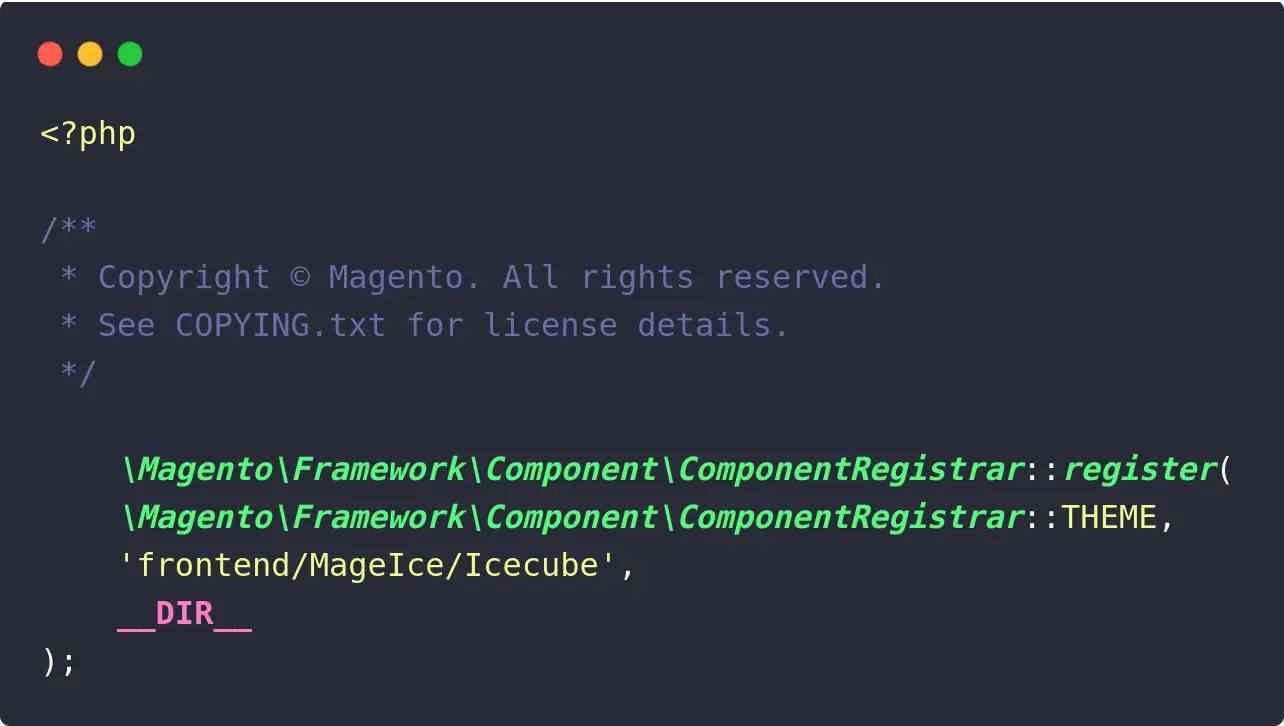
Adding registration.php
To register your theme in the system, create a file named `registration.php` in your theme directory with the following content:
PHP
Creating Directory Structure for Static Files
The theme package includes various types of files: styles, fonts, JavaScript, and images. Each type must be stored in its corresponding sub-directory within the `web` directory of the theme:
app/design/frontend/MageIce/Icecube
├── web/
│ ├── css/
│ │ ├── source/
│ ├── fonts/
│ ├── images/
│ ├── js/
Configuring Images
Product image sizes and other properties used by the theme are configured in `view.xml`, a required configuration file for the theme (optional if it exists in the parent theme). Create the `etc` directory and copy `view.xml` from an existing theme’s `etc` directory.
Declaring Theme Logo
In Magento, the default format and name for a logo image is `logo.svg`. If you use a logo file with a different name or format, you may need to declare it. Create a file named `default.xml` in your theme’s `layout` directory and include the following code, assuming your logo is `theme_logo.png` and its size is 300×300:
XML
![]()
Customizing Theme Layout
After setting up the basic theme structure, you can customize or override any layout to create a new design for your theme. The layout files for different components can be categorized as follows:
– **Base layouts:** Module layout files
– **Page configuration and generic layout files:** `Magento_Catalog/view/frontend/layout`
– **Page layout files:** `Magento_Catalog/view/frontend/page_layout`
– **Theme layouts:** Theme layout files
– **Page configuration and generic layout files:** `app/design/frontend/MageIce/Icecube/Magento_Catalog/layout`
– **Page layout files:** `app/design/frontend/MageIce/Icecube/Magento_Catalog/page_layout`
Note – In case you feel confused and unable to do the theme layout customization, we would recommend to hire Magento 2 developers as they are skilled to perform all customization task within a defined timeframe.
Creating a Theme Extension File
Instead of modifying Magento’s complete page layout file, you can create an extension file to include the changes you want. For instance, to customize `Magento_Catalog/view/frontend/layout/catalog_product_view.xml`, add a layout file with the same name in your custom theme directory:
app/design/frontend/MageIce/Icecube/Magento_Catalog/layout/catalog_product_view.xml
Configuring the Theme in Magento Admin Panel
To apply your custom theme, go to the Magento Admin panel:
- Navigate to Admin → Content → Design → Configuration.
- Click **Edit** on your store view.
- On the **Default Theme** tab, select your newly created theme from the **Applied Theme** drop-down menu.
- Click **Save Configuration**.
Final Deployment
Finally, run the following commands to deploy your theme files so they are visible on the Magento storefront. Log in to your Magento store SSH account, go to the Magento root directory, and execute:
sh
php bin/magento setup:upgrade
php bin/magento setup:static-content:deploy
If you have any further questions about Magento 2 theme development or Magento 2 development services or need assistance from our expert developers, then we are available round the clock for our clients. Just to let you know our services aren’t confined to development, Rock Technolabs also provides Magento 2 upgrade services, and Magento support & maintenance services.