A Must-Have Magento 2 Migration SEO Checklist for Ranking Higher

When we launch a Magento store, the first marketing strategy that comes to mind is search engine optimization (SEO). There could be a variety of reasons for having this thought. However, SEO as a marketing strategy possesses capabilities and abilities unmatched by any other marketing strategy.
SEO provides long-term benefits from increasing organic traffic to improving your website’s ranking in search engine results pages. According to EuropeanBusinessReview, 40 percent of consumers stated that they are more likely to purchase a product that appears in the top three organic results of the search engine results page (SERP).
According to Startup Bonsai, 89,595 searches are done on Google every second, which is a significant increase from the previous figure. These two statistics are self-explanatory and demonstrate the significance SEO has in today’s world. Doing migration correctly should be the priority as not doing so can make the website lose achieved ranking. So, it is always advisable to plan to migrate only after following the Magento 1 to Magento 2 migration SEO tips.
You May Also Like This: Magento 2 Migration Steps
Before you begin the actual migration process following our Magento 2 Migration SEO Guide, consider the following recommendations:
- Ensure that you have a complete substitute for your Magento 1 store. This includes all of your files, folders, and the database.
- Create a representation of your Magento 1 store on your computer. The Magento migration process should not be carried out on the live store.
- Analyze the situation in your store. Keep only the information you believe is necessary and discard the rest in preparation for Magento 2 migration SEO best practices.
- Check if your existing theme(s), extensions, and custom code are compatible with the Magento 2 platform.
- Migrate the data from your Magento 1 store’s cloned database to your live database.
- Remove all out-of-date and useless information from the database, including logs, recently viewed products, compared products, and so on.
- Replace your Magento 1 store’s existing copy of Magento 2 on the same hosting server that hosts your Magento 1 store.
- It would be best to ensure that store traffic and other SEO-related practices are as efficient as possible.
Now, let’s jump on the SEO bandwagon to prevent your Magento store from losing search rankings while migrating by following the SEO checklist for Magento 2 Migration provided below.
1. Plan your migration
Magento migrations are only successful when they are well-planned and executed with precision. Every Magento 1 shop owner has experienced the frustration of migrating their Magento site on their own and making a mistake halfway through the process. You run the prospect of having your website go down and losing valuable website information, which is every website owner’s worst nightmare come to fruition. Hence, It is advisable to hire certified Magento 2 developers
2. 301 Redirects
Second, you may want to redirect a single or a few pages within an existing domain name using a 301 redirection. Example: Suppose you want to replace the redirect chain with a 301 redirect in which there are 4 pages in a serial order. So, your redirect will be Page 1> Page 4. If you fail to implement 301 redirects mapping, your organic traffic, including paid traffic, referrals, and direct traffic, will suffer due to your failure.
In eCommerce stores, it is necessary and more convenient to map URLs that are organized by type. Magento stores typically have the following page structures: category pages, subcategory pages, product pages, CMS pages, the home page, the customer account page, and cart/checkout-associated pages. As a result, the subsequent URLs should be collected for Magento 301 redirect mapping:
URLs for products and categories can be obtained by requesting that developers export URLs from the database.
- Sitemap in XML format
- Crawling the entire website
a. Making Product Pages Map to Other Pages:
If a store has thousands of products, they likely used a standard product URL structure for both the old and new websites. But, the case with Magento 2 is different, it’s typically www.webssitename.com/producta or simply it can be (product name after domain i.e. www.websitename.com). If the old website followed the same approach, then the mapping will not be required in the future (need to test though if it’s the same using formulas in Excel).
b. Mapping Category Pages:
If there are differences in category URLs, look for some general principles that have changed, such as a directory being excluded or added, before continuing. In a similar vein to product naming, it is critical to double-check how category names have evolved. It’s possible that some manual mapping will be required as well.
c. CMS Pages:
Because eCommerce stores typically do not have many custom CMS pages, you may have to map them manually. You can find the pages by crawling both old and new websites. It is excluded from previously mapped categories and product pages, and filtering the results. URLs that are still available can be mapped.
If you require additional information on the various types of status codes available in addition to the 301 redirects, you can consult the Google documentation on Errors and Status messages.
3. Robots.txt –
This file is used by websites to inform web robots and web crawlers about the standards to be used. In simple words, it communicates about which page needs to be processed and scanned which should not be indexed. Magento has an odd penchant for displaying meta robot tags that are not set meta, as shown below:
Unfortunately, this can cause issues for search engines as a result.
The steps to configure the robots.txt file in Magento 2:
You can make use of the Magento default configurations. However, if any pages on your website are only used internally, and you would like to “hide” from search crawlers, you can do so by editing the robots.txt file and adding your custom configurations.
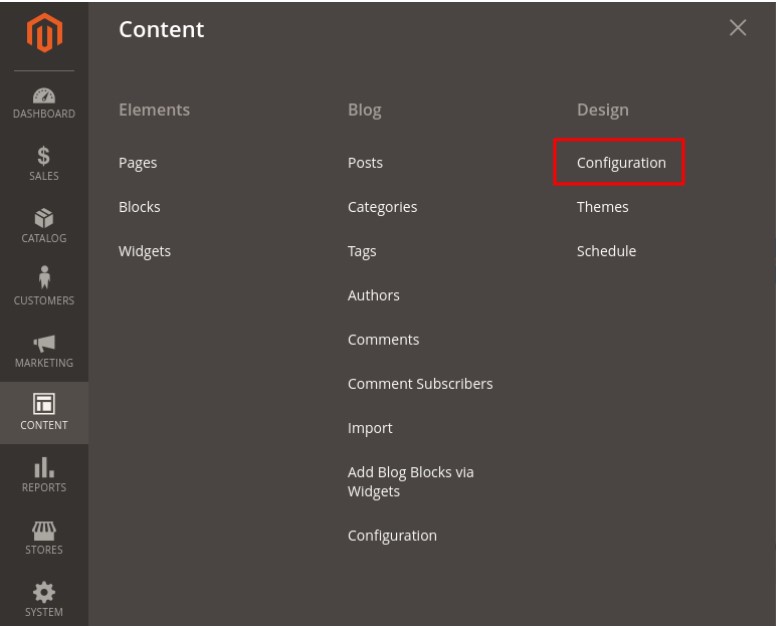
1. Select Content >Design >Configuration.
from the drop-down menu.
2. Select the Store for which you wish to modify the default robots.txt file.
3. Locate the Search Engine Robots section of the website.
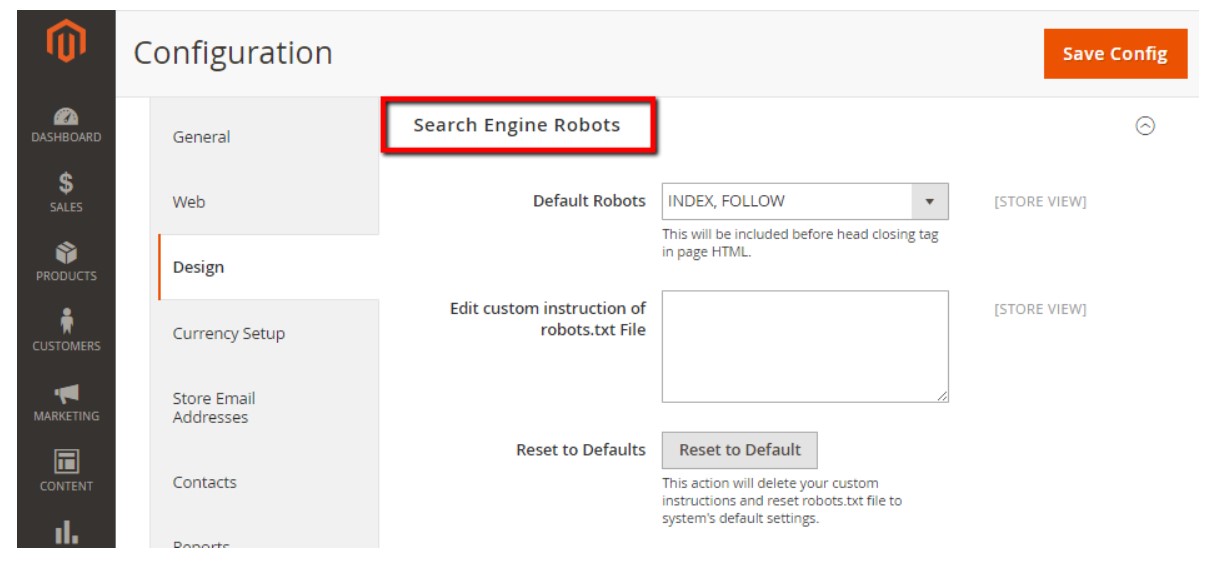
Select the default robots that you want to be enabled on your website in step four.
5. In the Robot.txt File section, under Edit custom instruction, enter the custom instruction you want the search engine to follow when analyzing your website. You can try the examples of custom robots.txt instructions that are provided later in this article.
6. Click the Reset To Defaults button if you want to clear out all of your custom instructions and start over with the default ones.
Keep in mind that you must remember to save the configuration once you’ve set the default robots.
Following the successful saving of the configuration, you may be prompted to flush the cache.
4. Sitemap –
The standard Magento sitemap functionality is minimal, even though it will typically include any page featured on the website (all product types, categories, CMS pages, etc.). When creating your XML sitemap, you should check to ensure that dynamic and low-quality pages aren’t included.
If you discover any other undesirable pages in the sitemap, your developer should be able to remove them from the sitemap at your request.
How do I generate an XML sitemap in Magento and configure it?
In general, a map represents the routes that can be taken to get from one location to another. In a similar vein, a sitemap is a map that provides crawlers with a way to find and index all of the pages on your website. After making the switch to Magento 2 migration SEO, you will notice a new option in the backend for creating a sitemap. Navigate to Store >Settings >Configuration >Catalog >XML Sitemap to view the sitemap. From this page, you can generate a basic sitemap that crawlers will use to index the pages of your website. As shown in the image below, you can specify the frequency and priority with which the category, product, and CMS pages are updated, among other things.
5. Canonical Tags:
When you have a site with many content, products, and categories, it’s pretty common for the same content to appear on multiple URLs. Canonical tags help to prevent this from happening. Canonical Tags (rel=canonical) are used to accomplish this. This tag informs Google of your preferred URL, which increases the likelihood of that URL appearing in search engine results pages (SERPs). It is possible to experience duplicate content issues if you do not use canonical tags in these situations. Furthermore, you are forcing Google to choose which pages to give SEO value to, or you are splitting the page’s value.
You’re saying that you want Google to
1) not show other pages with similar content in search results and
2) push ranking signals to this particular page. It also reduces the amount of time and resources that Google Bots will spend crawling pages, making it a win-win situation all around.
6. A/B Testing –
If you’re in the business of e-commerce, you’ve probably heard the term “A/B Testing” thrown around. A/B testing is a method of experimenting with your website’s design on real people. On the surface, it can be thought of as experimenting with how a website looks and functions and observing how it affects its users. With Magento A/B testing, you can use an experimental approach to narrow down the changes and find out precisely what is attracting your customers’ attention the most. The type of testing that relies on trial and error is beneficial in increasing conversion rates and achieving business objectives.
Magento extensions include the following:
- Amasty’s A/B Testing Service
- Optimizely
- A/B Testing at GoTop
- Experiments with the Blue Acorn Conversion
- Google Analytics is a web analytics service.
If you run a test for an insufficient amount of time, you risk having your results skewed. If you run the test for an excessive amount of time, the same thing might happen. Even though A/B testing is based on statistical and analytical principles, it does not necessitate the use of a mathematician.
Also Read: How to do SEO for Magento Website?
7. Product Page Optimization-
eCommerce website owners become so preoccupied with updating inventory for more competitive products, searching for new markets, and processing orders that they have little time, experience, or focus left over to devote to conversion optimization. As a result, they waste money on visitors who come to their sales pages due to search engine optimization, pay-per-click promoting, and other methods of driving traffic.
a. Product Pages – Customers want to know precisely what they are buying and want to know it quickly.
By optimising your Meta Title & Meta Description along with the following a proper SEO format of categorizing headings you can improve checkout flow.
b. Descriptions of Products – You should provide both the long and short description. The substance of the product should be included in the concise version: who the product is for, what it will do, and why it is good. The full description should give users enough information to address all of their questions. In contrast, the short description should give them a general overview of the product.
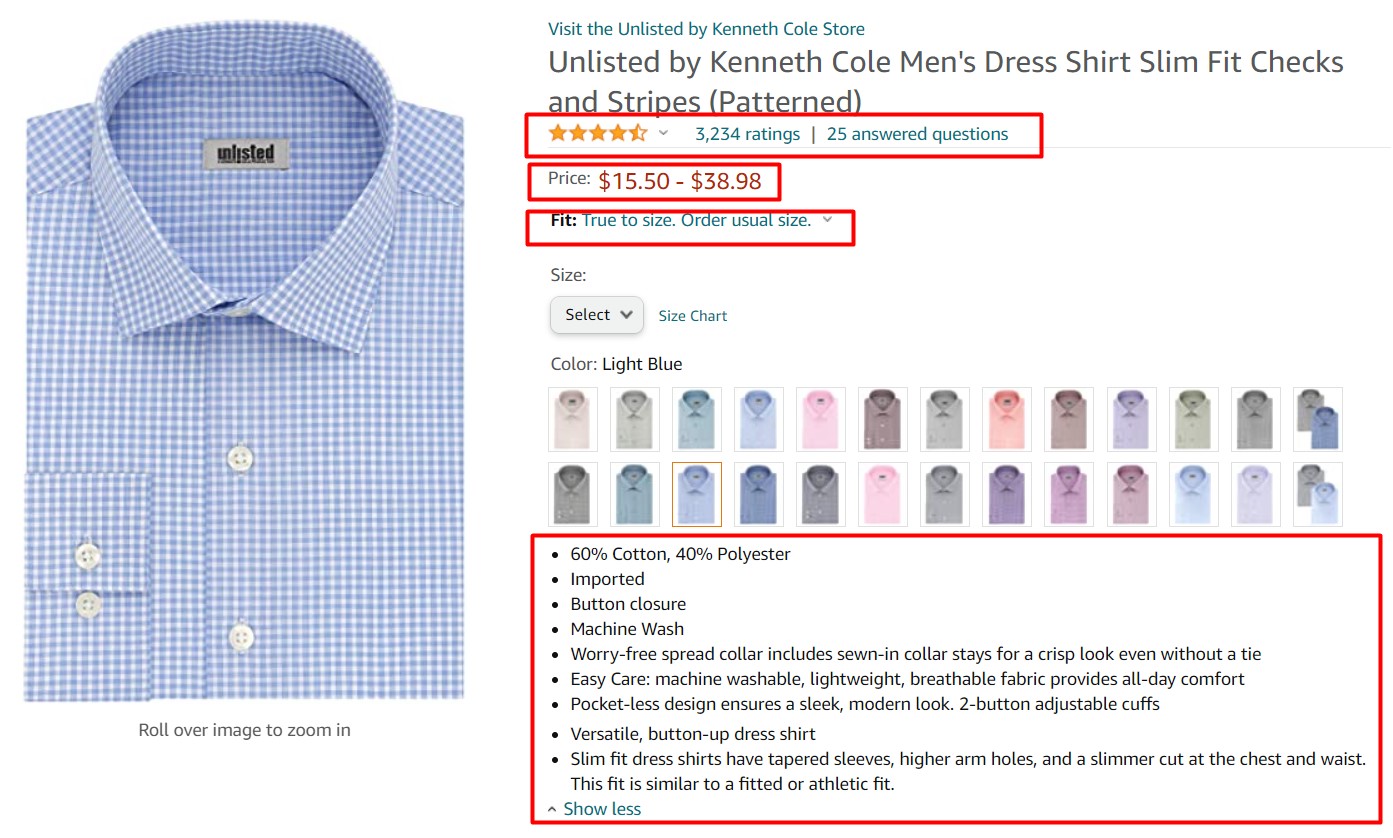
Image Source: Amazon
For example, look at this image you see the most required information that prompts a customer to make a purchase in terms of returns, exchange, payment and the originality of the product. Also, there is another section with a heading ‘Product Details’ that tells the customer why they should purchase this product.
c. Product Images and Videos – Pictures may convey information about your products more efficiently than words alone. Showing high-resolution, high-quality images of your products is the hero of increasing your eCommerce conversion rate. Showcase products from various perspectives and with zoom capabilities.
You might think that making high-quality videos will be a hassle, but try it out on a few components of your inventory to see if it makes a difference. It will undoubtedly assist you in persuading your buyers to trust your offerings.
While having a competitive, high-quality product is significant, having a well-marketed effect is probably more important. The practice of converting site visits into customers is known as conversion rate optimization (CRO). You obviously want your conversion rates to be as high as possible because, well, you want to sell more.
8. Internal linking –
If you have a small website with only a few pages, internal linking may appear to be simple. But what if you have a website with hundreds of blog entries or a store with tens of thousands of items and categories? It will be a strenuous effort to link relevant topics or products for such websites. It would be a fantastic idea to automate this procedure, where Magento 2 Cross Links Extension comes in. It enables you to automatically cross-link relevant keywords or key phrases across many goods, categories, or CMS pages.
Conclusion
It is not always the case that you will lose your search engine rankings due to the migration. By doing so and keeping this blog post in mind, you will be able to avoid any issues, and as a result, you will be able to drive more organic traffic to your Magento store. Following the post-Magento migration recommendations will assist you in staying on top of the ever-growing trend of SEO. If in case you’re a beginner then simply without any worries go for Magento 1 to Magento 2 migration services Please share your opinions in the comment section on your experience learning about the migration process in light of SEO best practices.